Small Space, Big Impact with Easy to Build Wall-to-Wall Alcove Shelving.
As an Amazon Associate I earn from qualifying purchases.
Alcove shelves are custom-built to fit into specific wall-to-wall spaces, maximizing otherwise unused nooks or recesses in your home. These shelves provide storage solutions without taking up valuable floor space. Alcove shelving is ideal for displaying books, framed photos, decor items, or even serving as a home for your entertainment center components. They are easy to build, requiring minimal wood.
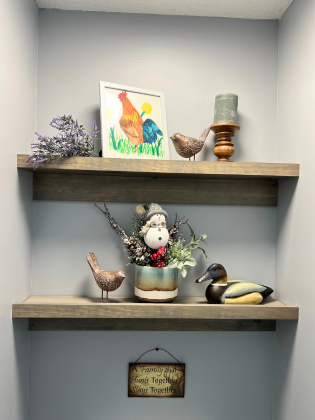
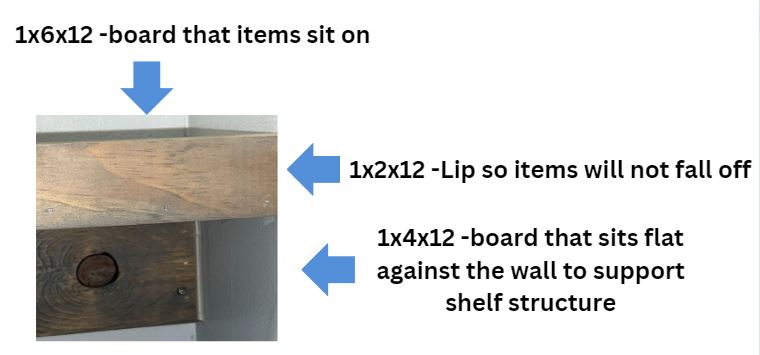
I wanted to add a lip to it so items would not fall off. After doing so, the appearance suggests a thickness of 1.5 inches for the shelf supporting the items; but this is not the case and I like the chunky shelf look. Refer to Photos.

Planning Your Design:
Before you start cutting, decide on the dimensions of your shelf with careful measuring wall to wall. I would recommend sketching your design on paper, including measurements for the shelf. Bear in mind that a 1x6x12 board is actual size: 0.75-in x 5.5-in x 12-ft and a 1x4x12 is actual size: 0.75-in x 3.5-in x 12-ft. If you wish to stain your boards, purchase “unfinished” for staining purposes and if you wish to paint them, I would recommend purchasing them “primed” with white paint for the boards you plan to paint. This will save you a step of not having to prime before final coats of finishing paint.
Type of Wood:
I chose pine boards which have worked great. But you may decide to use a harder wood, such as oak, maple, or cherry which are excellent choices as well.
Cutting the the Shelf:
Good News is you cut the boards all to one size: the measurement from wall to wall of your alcove.
Time to cut the boards to the length you have chosen. I used a board size of: 1x6x12 for the flat portion of the shelf the items would be sitting on .
Outside lip: I then cut the outside lip with board size 1x2x12.
Support Shelf (wood under the shelf:) 1x4x12
Caution-Safety first: Use eye protection: safety goggles and ear protection and be very careful to keep all parts of your body from any blade you are using during this project.
Stain and Paint before assembly:
If you wish to stain, here are the materials I used.
For the stained boards:
I sanded with palm sander. Wiped off sanding dust. Applied pre-stain, then stain and then polyurethane. Here are the stain colors I used.
Pre-stain: Minwax Pre-stain Conditioner (Oil Based Prep) It penetrates the grain of the wood to promote uniform acceptance of oil-based stains.
Stain: Minwax (Oil) in shade: Classic Gray 271
Poly: Minwax (Oil) Polyurethane (follow instructions on back of can.)
For the painted boards:
Paint: If you wish to paint them white, I really like this shade. Sherwin Williams (water based) Comes in “Ultra White” and I did not add any colorant to it. Finish I Used was : Satin
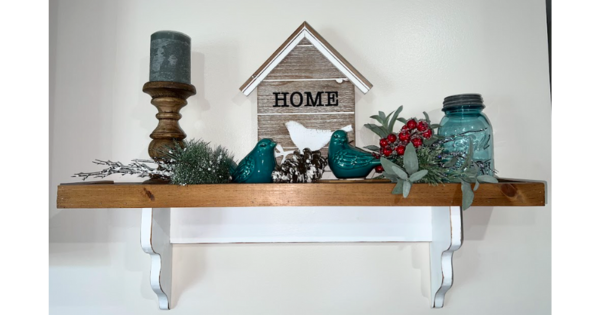
If you like the distressed edge look, I have done this in the past. To distress the edges of the painted white boards, I gently ran 220 grit sandpaper over all the edges, and dipped a small amount of stain on the corner of the rag and gently ran it over the wood that was now raw again from the sanding until it looked the way I liked.
Assembly:
First, I recommend using a “stud finder” to locate the studs behind your walls. Studs are typically spaced either 16 or 24 inches apart, but this can vary. Instructions are provided with the stud finder. First, I would mark with a pencil the horizontal placement you wish to place your shelves and then scan with the stud finder horizontally and mark with pencil the left and right side of the stud.
Then I attached the 1×4 as support under the main shelf. Refer to the photo. I placed wood glue to the back of the board you are attaching to the wall, then used brad nailer. For added stability, I used cabinet screws (Length size: 1.5” to 2”) to attach the edges of the boards to studs. Cabinet screws are “countersunk screws” which is a head that sits flush with or slightly below the surface of the material they are screwed into allowing for a smooth and neat finish. (I call them “headless screws” but that is not the official name.)
After attaching the support board (1×4) to the wall, I assembled two pieces together before attaching to the wall. I attached the 1×6 and the 1×2 (both cut to width of the alcove) and used wood glue first then used a brad nailer attached to the air compressor. Note that the 1×6 should sit at the bottom edge of the 1×2. Size of brad nails were: 18 gauge 1.5”.
After assembling and allowing the wood glue to dry, place wood glue to the edge of the 1×4 support shelf and brad nail the assembled shelf to the support shelf underneath. You can caulk any edges that you would like to finish smooth.
Supplies:
For the boards, I would recommend purchasing “unfinished” if you wish to stain and “primed” if you wish to paint the boards.
1x6x12 Unfinished pine boards
1x2x12 Unfinished pine boards
1x4x12 Unfinished pine board
Sandpaper (grits I used)
For Pine: start with #120 and finish with no finer than #220 (for water base stains) and 180 grit for oil base stains.
Wood Glue
Measuring Tape
Pencil
Safety Equipment: Safety Goggles, ear protection, etc.
Cabinet Screws 1.5” to 2” (I used 1.5”)
Brad Nails – 18 gauge 1.5”
Finishes:
For the stained boards:
For all the following products, instructions are on the back of the can.
Pre-stain: Minwax Pre-stain Conditioner (Oil Based Prep)
Stain: Minwax (Oil) in shade: Classic Gray 271
Poly: Minwax (Oil) Polyurethane This is a clear sealant—to enhance the natural beauty of the wood and protect it from wear and tear.
For the painted boards:
Paint: I like this for white boards. Sherwin Williams (water based) Comes in “Ultra White” and I did not add any colorant to it. Finish I would use would be: Satin
Tools:
Saw to cut the wood using a straight cut. Options are: Miter Chop Saw or circular saw or table saw or jig saw or hand saw. Lots of choices.
Nail Gun : Brand Nailer with nail size: 18 gauge 1.5”
Air Compressor (to use with nail gun)
Sandpaper- varying grit sizes 120-220
Clamps of varying sizes if you choose to clamp any piece.

